Monday, February 20, 2023

A Tsunami of Scramblers…

It is interesting to watch as waves of certain bikes come to me in cycles mostly unexpectedly. Last year it was a set of CB77s that came through the shop, including my ill-fated white CB77 purchased from Mecum auctions in 2022.

For the past few months I have been rebuilding a “special” CL77 that belonged to a celebrity a long time ago. The bike looked like a $50 parts bike when received and 90% of the engine was replaced. The chassis was all beat up and missing about 60% of the parts. Through various contacts, friends and eBay sellers, it is slowly coming back together, but continues to confound me with mysterious assembly issues.

Not long after the CL77 project arrived, a man from Visalia, CA (about 300+ miles away) got my name from someone else and desperately needed to have his 1963 CL72 engine overhauled. He has family down this way, so it wasn’t a complete trip just for the motor delivery. He dropped it off and it looked very dirty and sad on the outside, only to discover that the insides were worse. Like the project bike mentioned above, most of the engine internals needed to be replaced, including the crankshaft, cylinders and cylinder head, transmission and clutch, due to water damage.

During the same time, another man had been messaging me from the Santa Cruz area with CB92 clutch difficulties and wanted to bring it down for repairs. He also had family in the county, so it was also a dual-purpose trip. When he dropped off the CB92, I was just cracking open the CL72 engine and wondering where I was going to find a donor motor to fix it with. Fortunately, we both knew a friend in the Santa Cruz area who had CL72s stuff. He had given away most of it, but still had a motor sitting in storage that actually turned over and offered it to me for FREE! All I had to do was to bring it down here. So, once the CB92 mysteries were resolved, the owner picked up the CL72 motor and brought it down, then loaded up the Benly for the return trip back to Santa Cruz. Sometimes, it takes a village to get stuff done like this…

So, with a mostly finished CL77 project on my rack and a CL72 engine on the bench, a local friend decided to sell his 1966 CL77 which had been stored in his garage for the past 13 years! The bike was a partial restoration with about 11k miles showing on the odometer. So, on a swing past his N. County home for my monthly chiropractor appointment and a stop in to look in on my friend’s ailing CB350 (another mystery bike), I scooped up the 305 Scrambler and brought it home with instructions to go over it and make it run again.


Day One…

This bike presents itself nicely but has the usual patina in the nooks and crannies of a mostly original machine that had a cosmetic rework to the tank, fenders, and side covers, along with reworked wheels and a set of aged K70 Dunlop tires installed many years ago.

I checked compression and the readings were close to each other at about 140-145 psi, which is a bit on the low side, but this is a post-65 bike where Honda lowered the compression from 9.5:1 to 8.5:1 to lower the risks of piston seizures. The next step was to remove the carburetors, which had been drained back in 2008 along with the fuel tank. Lifting the slides out of the carburetors, I noticed that the needles were bright brass colored, indicative of KEYSTER carb kit parts. Sure enough, they were marked with D13 instead of the desired Kxxx numbers. The old spark plugs were supplied with the bike and they were quite fuel-fouled so it was looking like an uphill battle to get this bike running well again. NOS needles are NLA these days, although I had scored a set of them for the project bike before the seller ran out.

With the air filters removed, exhaust pipes loosened up to get the left side air filter cover and filter removed, the carburetors came out looking a little bit scaly, but serviceable. Back on the bench, the problems were revealed. One of the floats was bent sideways, hitting the inside of the float chamber, and was dented in on one side. One side had the correct 22.5mm float level and the other one was sitting at 28mm! They did have OEM jets installed, still, but there was scale inside the fuel inlet passages and one float bowl gasket was displaced at the front, no doubt causing a fuel leak when fueled up. One of the carb insulators was chipped out where the o-ring channel was formed, so that was probably another issue that caused running problems in the past. Once the carburetors are sorted out and reinstalled, attention will be focused on the ignition system.

Day Two

After several hours of cleaning, replacing parts and reinstalling the carbs to the bike, I hooked up my remote fuel bottle to the carbs. They promptly leaked at the bowl gaskets. Of course the worst one was on the left behind the pipes and next to the oil filler tube. After trying to replace the gasket again, I unhooked the carb, studied the gasket surfaces, changed to another gasket and changed the spring that holds the bowl up to one with more tension… No luck, it keeps leaking.

Prior to fueling up the carbs, I had statically checked the ignition timing after resetting what seemed to be a loose timing chain. There was a lot of slack at the crankshaft when turning it backward and forward to set the ignition timing. The timing was retarded and I suspected that the camsprocket weight springs were stretched and the timing was over-advancing when the engine was running.

I let the carbs fill to where they began to leak then shut off the fuel flow and started the engine. It lit off pretty easily but there was a bit of backfiring in the exhaust (straight bikes with Snuff-or-Nots installed) and the engine didn’t want to idle down smoothly. Checking the timing advance with my automotive timing light revealed spark timing issues as suspected. Retarding the spark timing to rein in the advance back to the II marks on the rotor left the idle timing near TDC (T mark) not at the F mark. And the left side was not advancing as far as the right side. Theoretically, both sides should advance the same amount because both sets of points are running off of the same point cam, which is extended into the right side camshaft and plugs into the slot in the spark advancer plate.

With the engine shut down, I took at a small pointed screwdriver and pushed the end of the point cam around and saw visible side play, which translates into a change of the point gap when the engine is running. Because the rubbing blocks are set at 90 degrees from each other on the point plate, there is a moment where both rubbing blocks push the point camshaft a little bit sideways and when wear occurs (speedo showed 11k miles), the point gap for the left side is different than the right side depending upon how much wear is in the shaft to camshaft bore. This side-play, coupled with the slack return springs on the spark advancer unit results in inaccurate ignition timing and uneven spark timing at idle to compensate for the over-advanced condition. So, the only fix is to replace the point cam and/or camshaft that it rides in, plus replace the advancer weight springs. What often is seen is that the camsprocket which contains the spark advance weights and springs works loose on the rivets that hold it together. The camchain sprocket starts to rock back and forth on the rivets and the ignition and cam timing are compromised. Sometimes the weights are worn at the pivot points, as well, so there are a lot of places for slack to develop in the ignition timing system.

Two possibilities for alleviating the timing problems to some extent are to install an electronic ignition plate that is magnetically triggered and doesn’t apply pressure to the point camshaft as it all turns. This can minimize the unequal spark timing from side to side, but doesn’t address any advancer spring slack or weight wear on the pivots. Beyond that, the cure without tearing the engine down is to install a crankshaft-mounted ignition system from a supplier in Germany, which is highly effective but costs about $500. https://www.elektronik-sachse.de/shopsystem-3/en/digital-ignition-zdg-3-23-for-honda-cb72-77.html

So, after consulting the surprised owner, I offered to remove the cylinder head top cover (which you can only do on a Scrambler with the engine in the chassis) and inspect the camsprocket springs and weights.

Day Three – problem-solving

I grabbed a bunch of wrenches and some paper towels, then went to work in removing the top engine mount from the frame which holds the condensers as well. I removed the spark plugs to reduce the chances of the pistons pushing the top end up off the base gasket, which causes a leak. With the top cylinder head cover off, the baffle plate was found to have been glued in place with Hondabond type of grey adhesive. The cover was pried up a little at a time which caused the gaskets to tear anyway. Once the baffle plate was removed, the camsprocket springs and weights were checked for any slop and wear. In this case, the first advancer weight and spring were actually pretty snug, but when the point cam was turned, the weight didn’t spring back to the beginning position. I turned the motor over with the rotor bolt and checked the other spring/weight. The spring looked like it had been poked with a screwdriver or something to upset the coils and lessen the tension on the weight. I hadn’t tried a “springectomy” with the engine in place before, but doing it on a Scrambler is the only possibility.

The end of the spring was partly lifted up with needlenose pliers and the loop pulled away from the mounting post. The spring needs to be turned 90 degrees to unhook it from the back side of the advance weight. I had stuffed paper towels in and around the camsprocket to prevent any unexpected drops into the cylinder head or the camchain/rollers. Fortunately, I had a NOS return spring in stock, which is used on the CB/CL camsprockets. The Dream sprockets have larger weights and lighter springs to allow for an earlier spark advance curve. With some careful use of the pliers and a hook tool, I was able to hook the spring on the weight, turn it and loop the other end up over the post successfully.

Checking the spring action on the weight gave the desired return function, which was verified when the ignition timing was rechecked after the reassembly of the top cover and gaskets. I used GasketCinch to reglue the gasket surfaces back together and while I was waiting for the glue to set up, I attacked the carburetor one more time. All the surfaces were clean for the gasket to seal the bowl, but something else was working against me. When I rechecked the float level, it was at 22.5mm but the float itself was bouncing up against the roof of the float chamber. I have observed that when the Keyster kit float valves are used, there is some dimension that causes the floats to bounce off the top of the float chamber when the level is set properly. I dug out a good used 2.0 float valve that had a “K” stamped on it (Keihin) and tried it with the rest of the parts and surprisingly the float had an extra 1/8” of clearance before it could be pushed up to the roof.

I hooked up my fuel line system to the carburetor, while it was still off the engine to verify that it wasn’t leaking any further and it had indeed stopped seeping as it had previously. I went ahead and reinstalled the carburetor, hooked up the air filter, installed the left filter cover and then reattached the loosened exhaust pipe set for the 5th time. With the remote fuel bottle feeding the carbs, no leaks were detected! I kicked the engine over and it started quickly, finally settling down to a mostly normal idle. I rechecked the ignition timing with my Sears timing light and had to back the spark timing a little bit more, still with the full advance coming right into the II marks on the rotor, so at that point, the mission had been accomplished.

I installed the fuel tank and seat and added some fuel to the tank for a test ride. The tires had 5 lbs of air so they were reinflated and off I went for a test ride that took about 10 minutes. The bike was a little bit cold-blooded and was snapping back at the exhaust pipes at part throttle. It pulled well under power and went through the gears cleanly. It’s possible that the heavy clutch pull is the result of a Barnett clutch pack and springs, but when I put it in gear with the clutch lever pulled in I could stop the rear wheel with the foot brake pedal and the engine didn’t die.

The spark plug wires had been replaced and a set of SPARKY plug caps were installed on the plugs which require the screw-on tips to make a good connection. The wires were a little bit on the short side and when I looked back into the plug caps I noticed that the little coil end of the plug cap hadn’t been fully pushed through into the corner of the cap, so the spark plugs were getting arcs from the displaced wire ends instead of being solidly attached to the plugs.

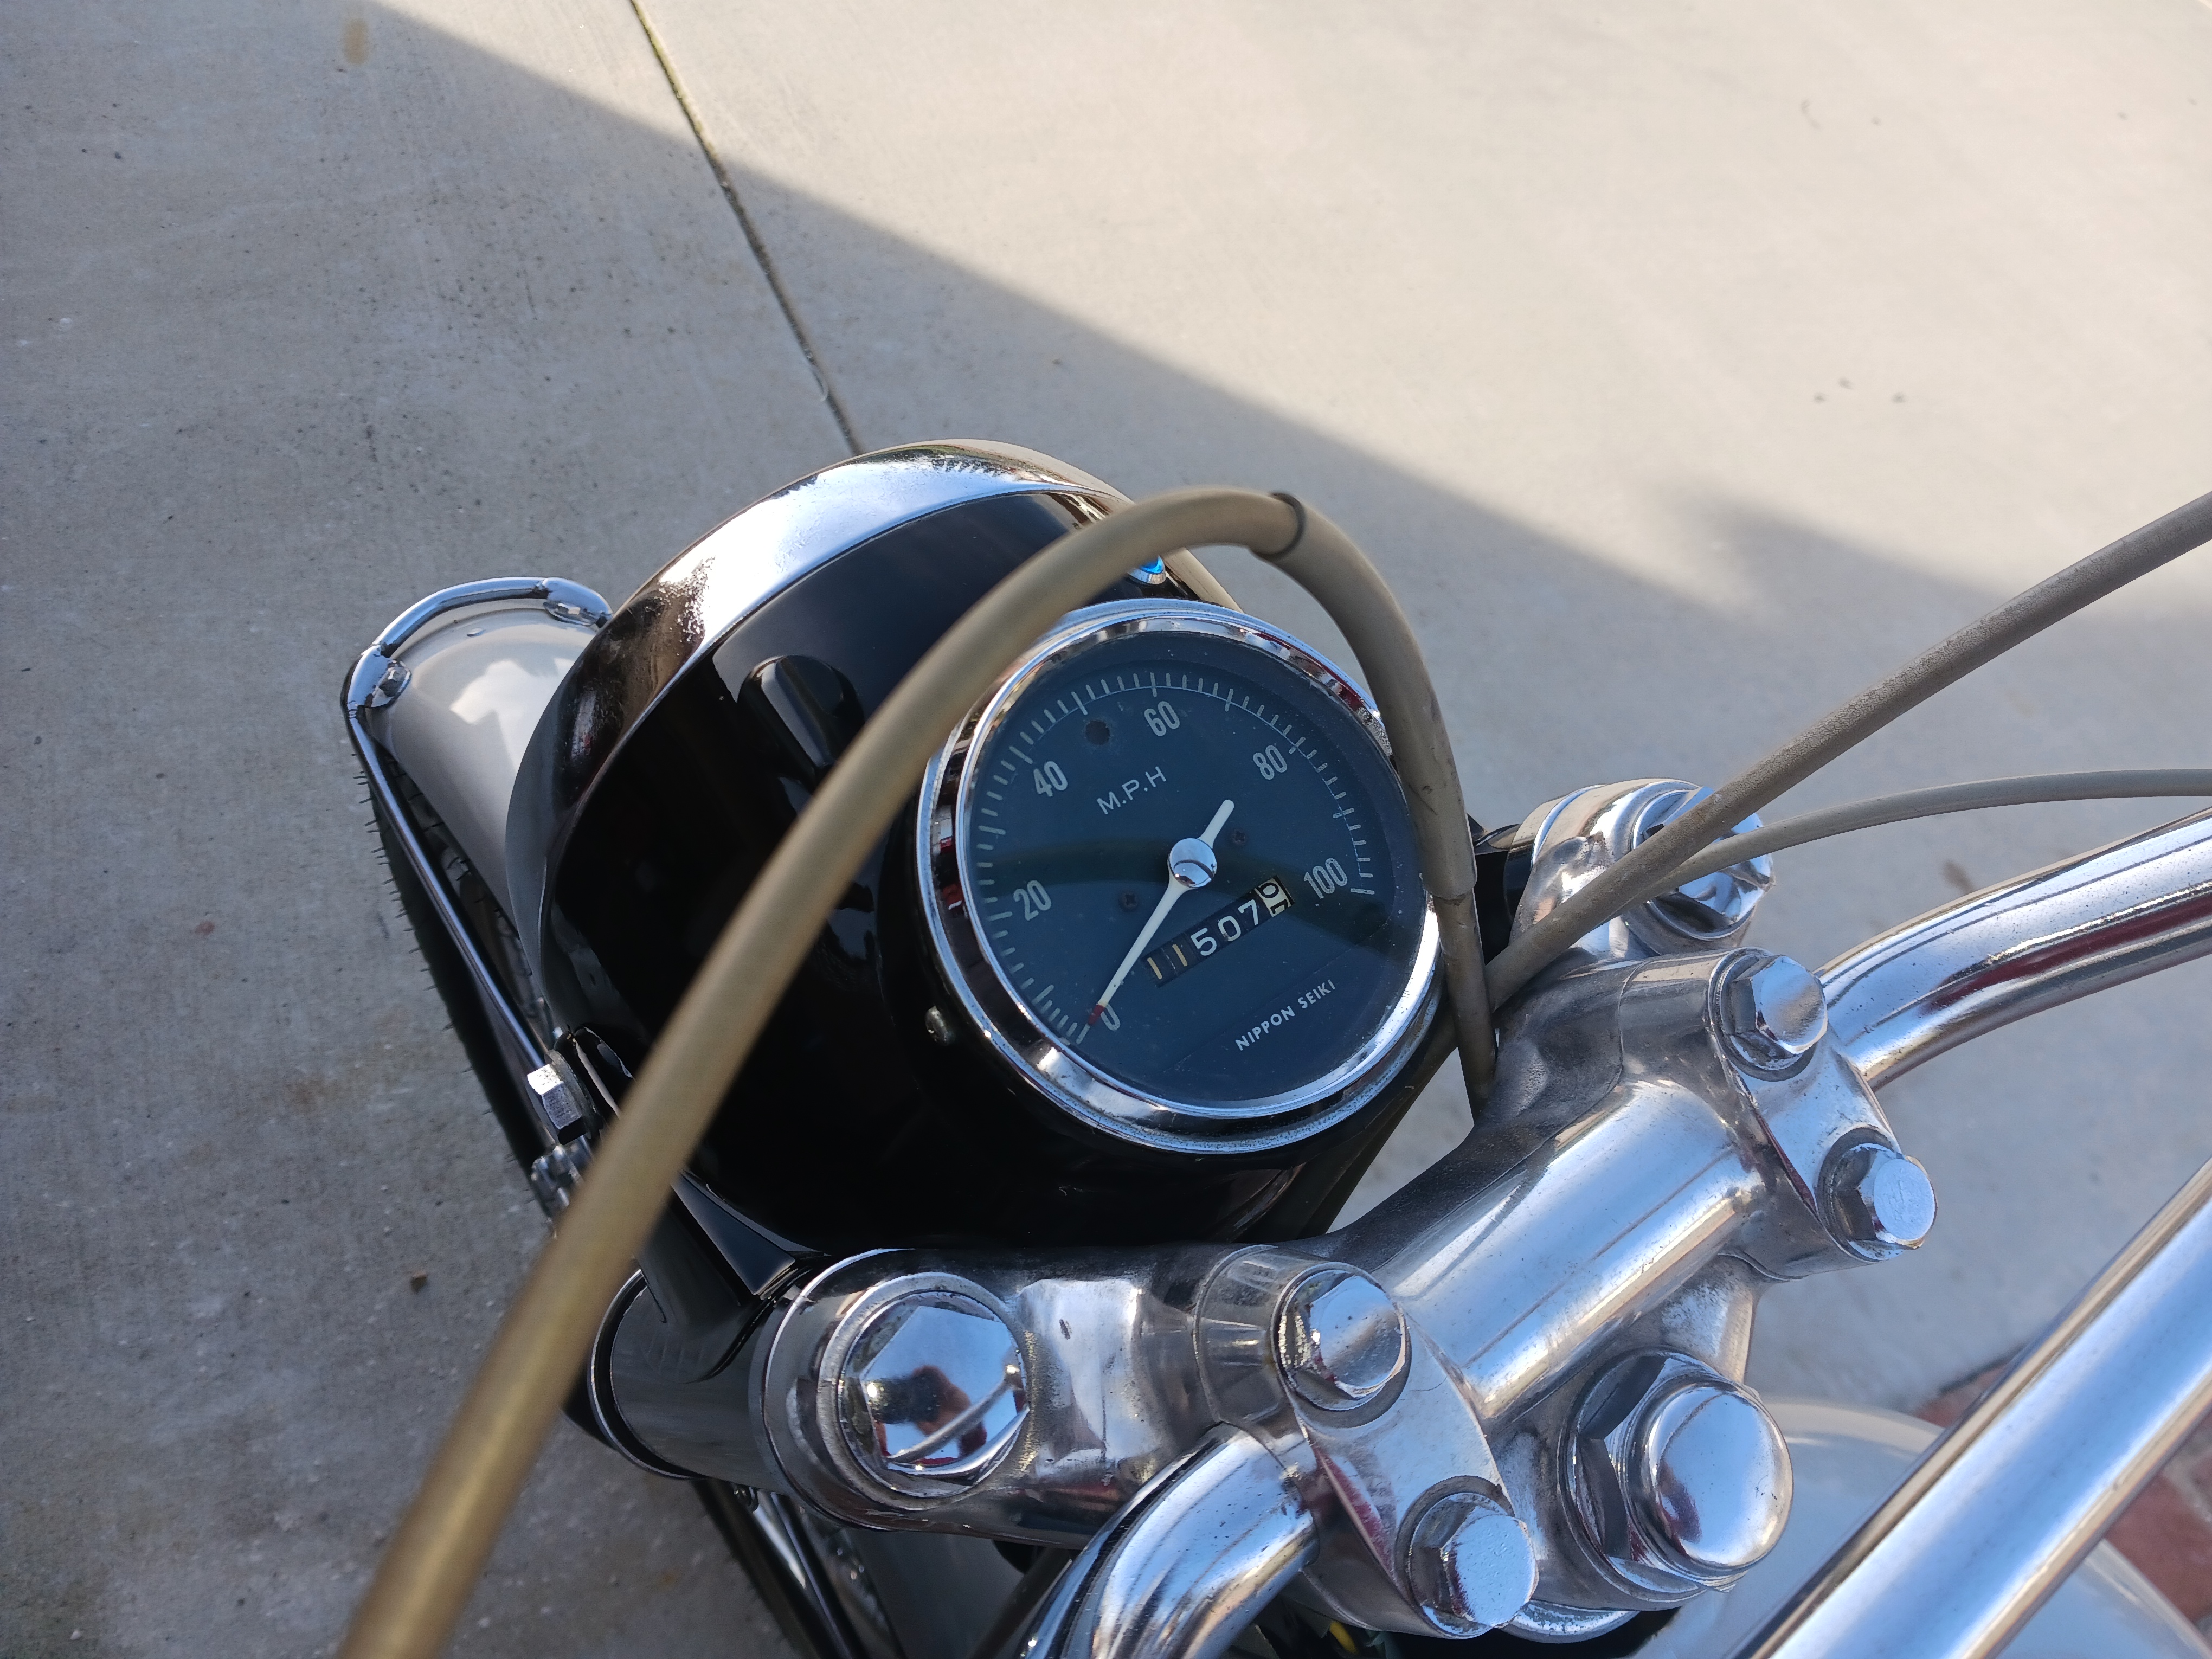
The test ride was good overall but the speedometer needle immediately went to 100 mph as I was cruising down the road at about 45 mph. I recommended that the unit be sent to Foreign Speedo, here in San Diego, for one of their meter overhauls in the near future. The bike is for sale, so the new owner might wind up handling the speedometer problem after being informed or seeing what happens on a test ride of his own prior to purchasing.

I loaded up the bike and sprinted up the highway at 2pm which can get busy around that time, but I managed to make the 28-mile trip in 35 minutes and the return leg only took about 45 minutes, which was a relief. The owner had some extra muscle available to help me unload the bike and I lit it up for them and ran it down the road under power with the Scrambler pipes rattling the neighborhood.

I was concerned that I was going to have to tear down the engine to get the camsprocket out and have it sent out for repairs, but with a little patience and some careful work, the end result was a revived CL77 which had been awakened after a 13-year slumber. It feels nice to see it back in action again.


Bill Silver   aka MrHonda  

2/23


Thursday, February 2, 2023

Vintage Hondas… Expect the unexpected

You can bet your sweet S90 that it will be a surprise along the way.

                                                              1965 Domestic Honda S90

If you stay in one place for a long time and work on a lot of local bikes, at some point in time one of them will come back around again. So, when the “Honda S90” listing on Craigslist showed up I was intrigued but not triggered to remember the bike from my past. A quick message to the owner yielded a response that went, “You worked on this bike 10 years ago.” Hmmmm???

We made an appointment to meet up about 15 minutes away and the bike was in a pretty sad state once you got close to it. Both tires were flat and off the rims, the engine appeared to be seized, very old gasoline was still in the fuel tank, the battery was dead and it was obvious that the bike was actually a JDM domestic version judging from the tail light, solid passenger pegs, low handlebars and a side stand that was factory attached to the footpeg bracket. The speedometer was in MPH, but it didn’t have a neutral light function, just a high beam indicator and a meter light. The headlight switch had only a H-L setting with no on-off function, so there were many puzzling features as the investigation continued.

We struck a “reasonable” deal price and the owner’s husband helped push the poor little dead S90 up the driveway, from behind the apartment building and into the back of my Tacoma. The bike was pretty complete, but the wheel hubs were all chalky from sitting somewhere wet for a long time and the rims has rust pits in various places. I was told that the bike had been run for a while, but judging from the virtually unused front tire with a 2011 date code, it didn’t go very far. The bike didn’t have a title anyway, nor a license plate, as it was a project bike at the time, made from various parts which became more apparent as time went on.

While unloading the bike from the truck, the shift lever got bumped and the engine engaged, turning backward, releasing whatever the stuck piston was doing previously. I resolved to remove the engine and take a close look at what had happened to it, while starting a parts order for tires, tubes, and a battery to get things started.

With the stock muffler removed and the intake manifold/carburetor taken away, the engine drops out with just three bolts. I hauled it up on my bench and proceeded to dismantle the top end fearing the worst. But as it came apart, the piston crown was mostly shiny from low hours, but signs of water intrusion were present. The cylinder had some staining, but the piston wasn’t seized, although the top compression ring was kind of stuck in the ring land. A little penetrating oil and some careful movement freed the ring and it appeared to be good enough to reuse again. A quick hone of the cylinder was done to rough up the surfaces just a little bit.

The cylinder head was more of a mess. Old valves were cupped and water had gone down in the intake port where it etched away at the metal just behind the valve seat. New valves were ordered and the seats were re cut with my ancient set of OEM valve seat cutters. Fortunately, the seats had enough material left to allow for valve seating, so the head was reassembled and installed back on the engine.

A new clutch cover was ordered from DavidSilverSpares.com as the original was broken where the clutch cable is secured. There are two different clutch covers, depending upon the serial number of the engine, which was harder to determine as there were no serial numbers on the engine apart from the cast in S90E and the space below was blank.

The wheels required some cleaning and the brake drums scraped clean with a screwdriver blade then wire wheeled and finished with a Scotchbrite pad. A set of inexpensive scooter tires, tubes and rim bands were ordered from an eBay seller, so they were spooned on after de-rusting the rims as much as possible. New brake shoes were ordered from an eBay seller for very little money, having come from China.

One fork seal appeared to be leaking so the forks were removed when the wheel was taken off for tire replacement. The right side fork had a screw-on fork seal holder, but the left side had a conventional fork slider with the seal retained with a snap-ring. When they were reinstalled, it turned out that they were different lengths! I wondered why the axle came out with some difficulty, but now it was apparent what that was the case. The difference was probably about an inch with the forks uncompressed, but pulling down on the front end finally matched them up enough to insert the axle once again. I have to say that I haven’t run across that problem before! Either the long fork is from a later version or perhaps from a CL90 bike instead. Finally, the front brake cable was excessively long. The early low handlebars take a shorter cable, of course and someone just ordered a high bar US version. The clutch cable was the correct length, however, as was the throttle cable

The ignition coil was replaced due to a cracked spark plug wire and general age-related damage. Once everything was correct, the little engine was wrestled back into the frame. The fuel system was next on the list so the Chinese copy of the original angled base carburetor was cleaned, which was a type that Honda used on the early engines connected to the head with a twisted intake manifold. The early carb setup requires a unique air filter and connector to put it all together. All the parts were connected originally, so it is puzzling how water had worked its way down into the intake port.


So, just when you think you have it all sorted out, the unexpected happens… The compression tested out about 130 psi, which is about 20 short of normal, owing to a less-than-ideal valve seat repair attempt. Still, it should have at least started up, but when the battery was checked, it was down to 3 volts from six. Given that the only thing that can drain the battery down is the rectifier, it was apparent that it would need to be changed. And to change the rectifier, you have to remove the engine.

I recharged the battery back to 6 volts and installed it without hooking up the rectifier, just to see if the engine would start up. I had compression, spark, and fuel in the carburetor, but it wouldn’t even give any signs of life. The spark plug appeared to be dry despite all the kicking, so the carb was removed again for a check of the idle jet and passages. Everything seemed to be in order, but it didn’t affect the starting routine at all. Kicking the engine over with the spark plug out I noticed that the spark was erratic at the plug. The spark plug cap tested normal, so all that was left was the possibility that the condenser was failing. Apparently, the part that was failing was my brain because when I assembled the coil on the top of the engine case, somehow I failed to reinstall the condenser! Of course, in order to check the coil and condenser, you have to remove the engine again.

To cure the compression issue, I removed the head again, stripped it of all the valve train stuff and took it to my local machinist, who cut nice fresh valve seats to match the new valves for $25. When the engine was reassembled the compression jumped up to 150psi, which is in the range of factory specs. Sometimes, the DIY efforts are better left for the professionals.

In the meantime, I ordered a cheap rectifier from an eBay seller who modifies those little solid state cube bridge rectifiers like Radio Shack used to sell for a couple of bucks. The unit was already made up with long proper colored wires, but when I went to install it the mounting bolt was just a round 6mm bolt and the hole in the chassis is half-round! So, at that point, the options are to either drill out the frame hole or grind a flat on the bolt. I put the bolt on the grinder wheel to make it flat on one side, but when I tried to install it, the bolt proved to be too short! Back to the shop to find a longer bolt or screw, which I found in a 6mm Phillips screw from my drawer of fasteners. I had to regrind a flat on the screw again and finally got the little unit to fit back into the frame hole.

The problem with these little S90 engines is that they are just kind of egg-shaped and it is difficult to find a nice flat space to use to raise it back into the frame without it wobbling all over the place in the process. The engine harness plug is tucked up way inside the frame, so you have to reach up and plug it in carefully while balancing the engine on a stand or jack. Finally, with a condenser installed and the new rectifier bolted up, the three mount bolts were inserted and the rest of the fasteners were installed.

Having charged the battery once more, it was installed and hooked up to the new rectifier and the bike was ready for another starting attempt. Not surprisingly, once a proper condenser is installed, the bike lit off on the second kick, as it should.

A final challenge was the fuel tank and petcock. The tank had been sealed with Kreem about 10 years ago and that product doesn’t really hold up in the long term. Plus it looks like they just poured it over the top of existing rust so the insides had been peeling away from being exposed to old gasoline left behind the last time it ran. The petcock brass tube was gone, eaten away by corrosion. I cleaned out the passages and installed what I thought was a new 4-hole petcock gasket, but apparently, it was used in the past and had hardened enough to allow gasoline to slip past the surfaces of the seal.

The correct petcock for the early model S90s is difficult to find now, as it has a crossover tube to connect the bottoms of both sides of the fuel tank together. There are numerous Chinese copies of these petcocks as they fit a number of models. There are variations with an outlet that points down, points sideways, with and without the crossover tube that also points in different directions. What seems to be the problem is that most of the fuel line fittings for these copies are for a 4mm hose instead of the 5.5 mm hose that is needed to connect the carburetor to the petcock. These petcocks are dirt cheap, so I ordered one similar to the one on the bike, which didn’t have a crossover tube fitting, just to get something fitted up to allow the fuel tank to be installed so the bike could be test-driven. Unfortunately, the first try with an eBay seller yielded the wrong version despite the fact that I had ordered the correct one to match what was on the bike now.

With the engine back in the chassis and the chain hooked up, I confirmed that the transmission is a rotary gearbox design, which is great for around-town traffic, but not if you were going to ride it in some kind of competition. The gear pattern is N-1-2-3-4-N going down, down, down, down. You can, of course back shift it to gear down, but not paying attention to the transmission in 4th gear will get you into neutral at a high speed and if you push down again, you get 1st gear when you are going 50mph. So, you just have to override your normal shift pattern in your mind to compensate for this feature.


Finally, once the bike was running and safe to ride around the block, the first thing I notice is that the clutch is slipping! I thought it felt a little off when I was kick-starting it so much, kind of not catching the engine fully and the suspicions are confirmed! Another order to DSS for some clutch plates and a few days of waiting to install them. Ordinarily, these little clutch packs are pretty bullet-proof, but not knowing the full history of the engine can lead to more surprises when it comes down to getting the bike to go down the road.


Removing the clutch revealed that one of the friction plates deteriorated so it looked like I had three steel plates and one friction plate. All the friction material was gone from the plate and bits had lodged around within the clutch hub. New parts were installed after cleaning out the old debris and suddenly I had a bike that kicked over smartly and didn’t slip when power was put to the motor. That one should last for years to come.

Historically, the OHC 87cc engine had a 20-year run of production. It replaced the pushrod C/CT200 engine in 1964 and wound up expanded in the CT110 models for the early 1980s. Going over the parts lists for the S90s is a real head-scratcher. There are three sets of engine cases, two clutch covers, different oil pump and filter screens, two series of transmissions, different cylinder heads, intake manifolds, air filter systems and carburetors. By the time the CL90 versions came out in 1967, most of the major redesigns were completed, but the early years of the Super 90 are full of modifications and parts that are not interchangeable with later versions.

Apart from the Chinese copy carburetor, which is unique for the early models, the other modification to the engine was a “performance” camshaft from DRATV.com which is a $40 investment. I have used this cam in conjunction with a big bore piston kit on a couple of CT90s and it really woke them up. The cams are a drop-in modification, having extended cam timing but no changes in the base circle or valve lift.

Electrically, the light bulbs were all blown out from someone running the engine without a good battery in place. Typically, the US bikes have a headlight switch has an ON-OFF, LOW, HIGH function all built into a single unit. The domestic bikes only have a HIGH-LOW switch on the left side and no separate ON-OFF switch function. That is controlled by the ignition switch which has OFF-ON-Lights settings instead. The unique domestic tail light has its own mounting bracket, lens unit and base not commonly found in the US. The original turn signals were MIA. The low beam of the replaceable bulb was burned out so DRATV came to the rescue once again.

In order to get the bike registered in CA it has to have an engine number, which is missing on this machine. California has its own CA-assigned stickers that are applied to either the frames or engines when cases like this occur. That will require a separate trip to the CHP office after the first go-round with the local DMV office.

Slowly, but surely, the bike is coming back to life and full function once again. Even tiny little bikes like this can consume a lot of time and effort to revive. S90s require attention to detail and a close study of the various superseded parts that were made as production increased through 1969.

Honda finally replaced the venerable, horizontal OHC 90 series machines with new CB/CL100s with upright cylinders, followed by a 125cc version, which also included the SL100-125, the one-year CT125 and eventually XL100-125 singles, all fitted with a 5-speed transmission. The basic design morphed into later XL185-200 and XR200 versions. The 90s did do extended service in the US90/ATC90-ATC125 three-wheeler models until 1985, so the linage of the original design carried on for more than 20 years.

Bill Silver aka MrHonda

www.vintagehonda.com

2-2023