One
of the most confusing Honda Super Hawk models is the model designated
CP77. Unfortunately, Honda made factory Police bikes with CP77 in the
serial numbers, as well, but they are a completely different model to
the non-Police bike CP77.
CP77 is completed and running again.
The
short version of the model is that it is a chassis-modified CB77 305
Super Hawk with the same powerplant and suspension as the rest of the
CB77 editions. The difference in the chassis configurations are the
high handlebars, winkers (turn signals), a dual-element headlight,
the early 1961 style tail light, non-folding footpegs, Dream 300 tank
badges and generally, a sidestand was fitted.
See:
https://www.cmsnl.com/honda-cp77-general-export-142683_model14957/partslist/
for the whole parts list and CP-specific part numbers.
I
had a preview of this bike when it was shared on an eBay auction. It
didn’t look that bad in the photos, but the bike was located in
N.Cal and with shipping, it didn’t really pencil out for me,
knowing that the engine was seized, as described by the seller. When
I put up a nominal bid the seller saw my name and messaged back to
me: “If anyone can fix this bike, it’s YOU!” which was a kind
thought, but after more consideration I let further bids take over
and forgot about it.
Well,
as things go in my life, my local friend Don Ince happened to be
friends with the ultimate buyer who asked if I would take a shot at
rebuilding the engine for him. I agreed to put it into the queue and
after a few weeks, Don brought it by the house and dropped it off in
the driveway. ARRGH! With only 1600 miles showing on the
speedometer, the bike was covered with rust and corrosion on just
about every metal surface. White fuzz was all over the engine
surfaces, rust on the brake hardware (brake cams were stuck, of
course), and it was dirty from top to bottom. The CA license plate
had 1977 tags in the corner. An aftermarket rear rack complicated
seat removal and will be discarded. The tires were both original and
everything on the bike appeared to be as from the factory, but having
spent way too much time in a moist environment, unprotected from the
elements.

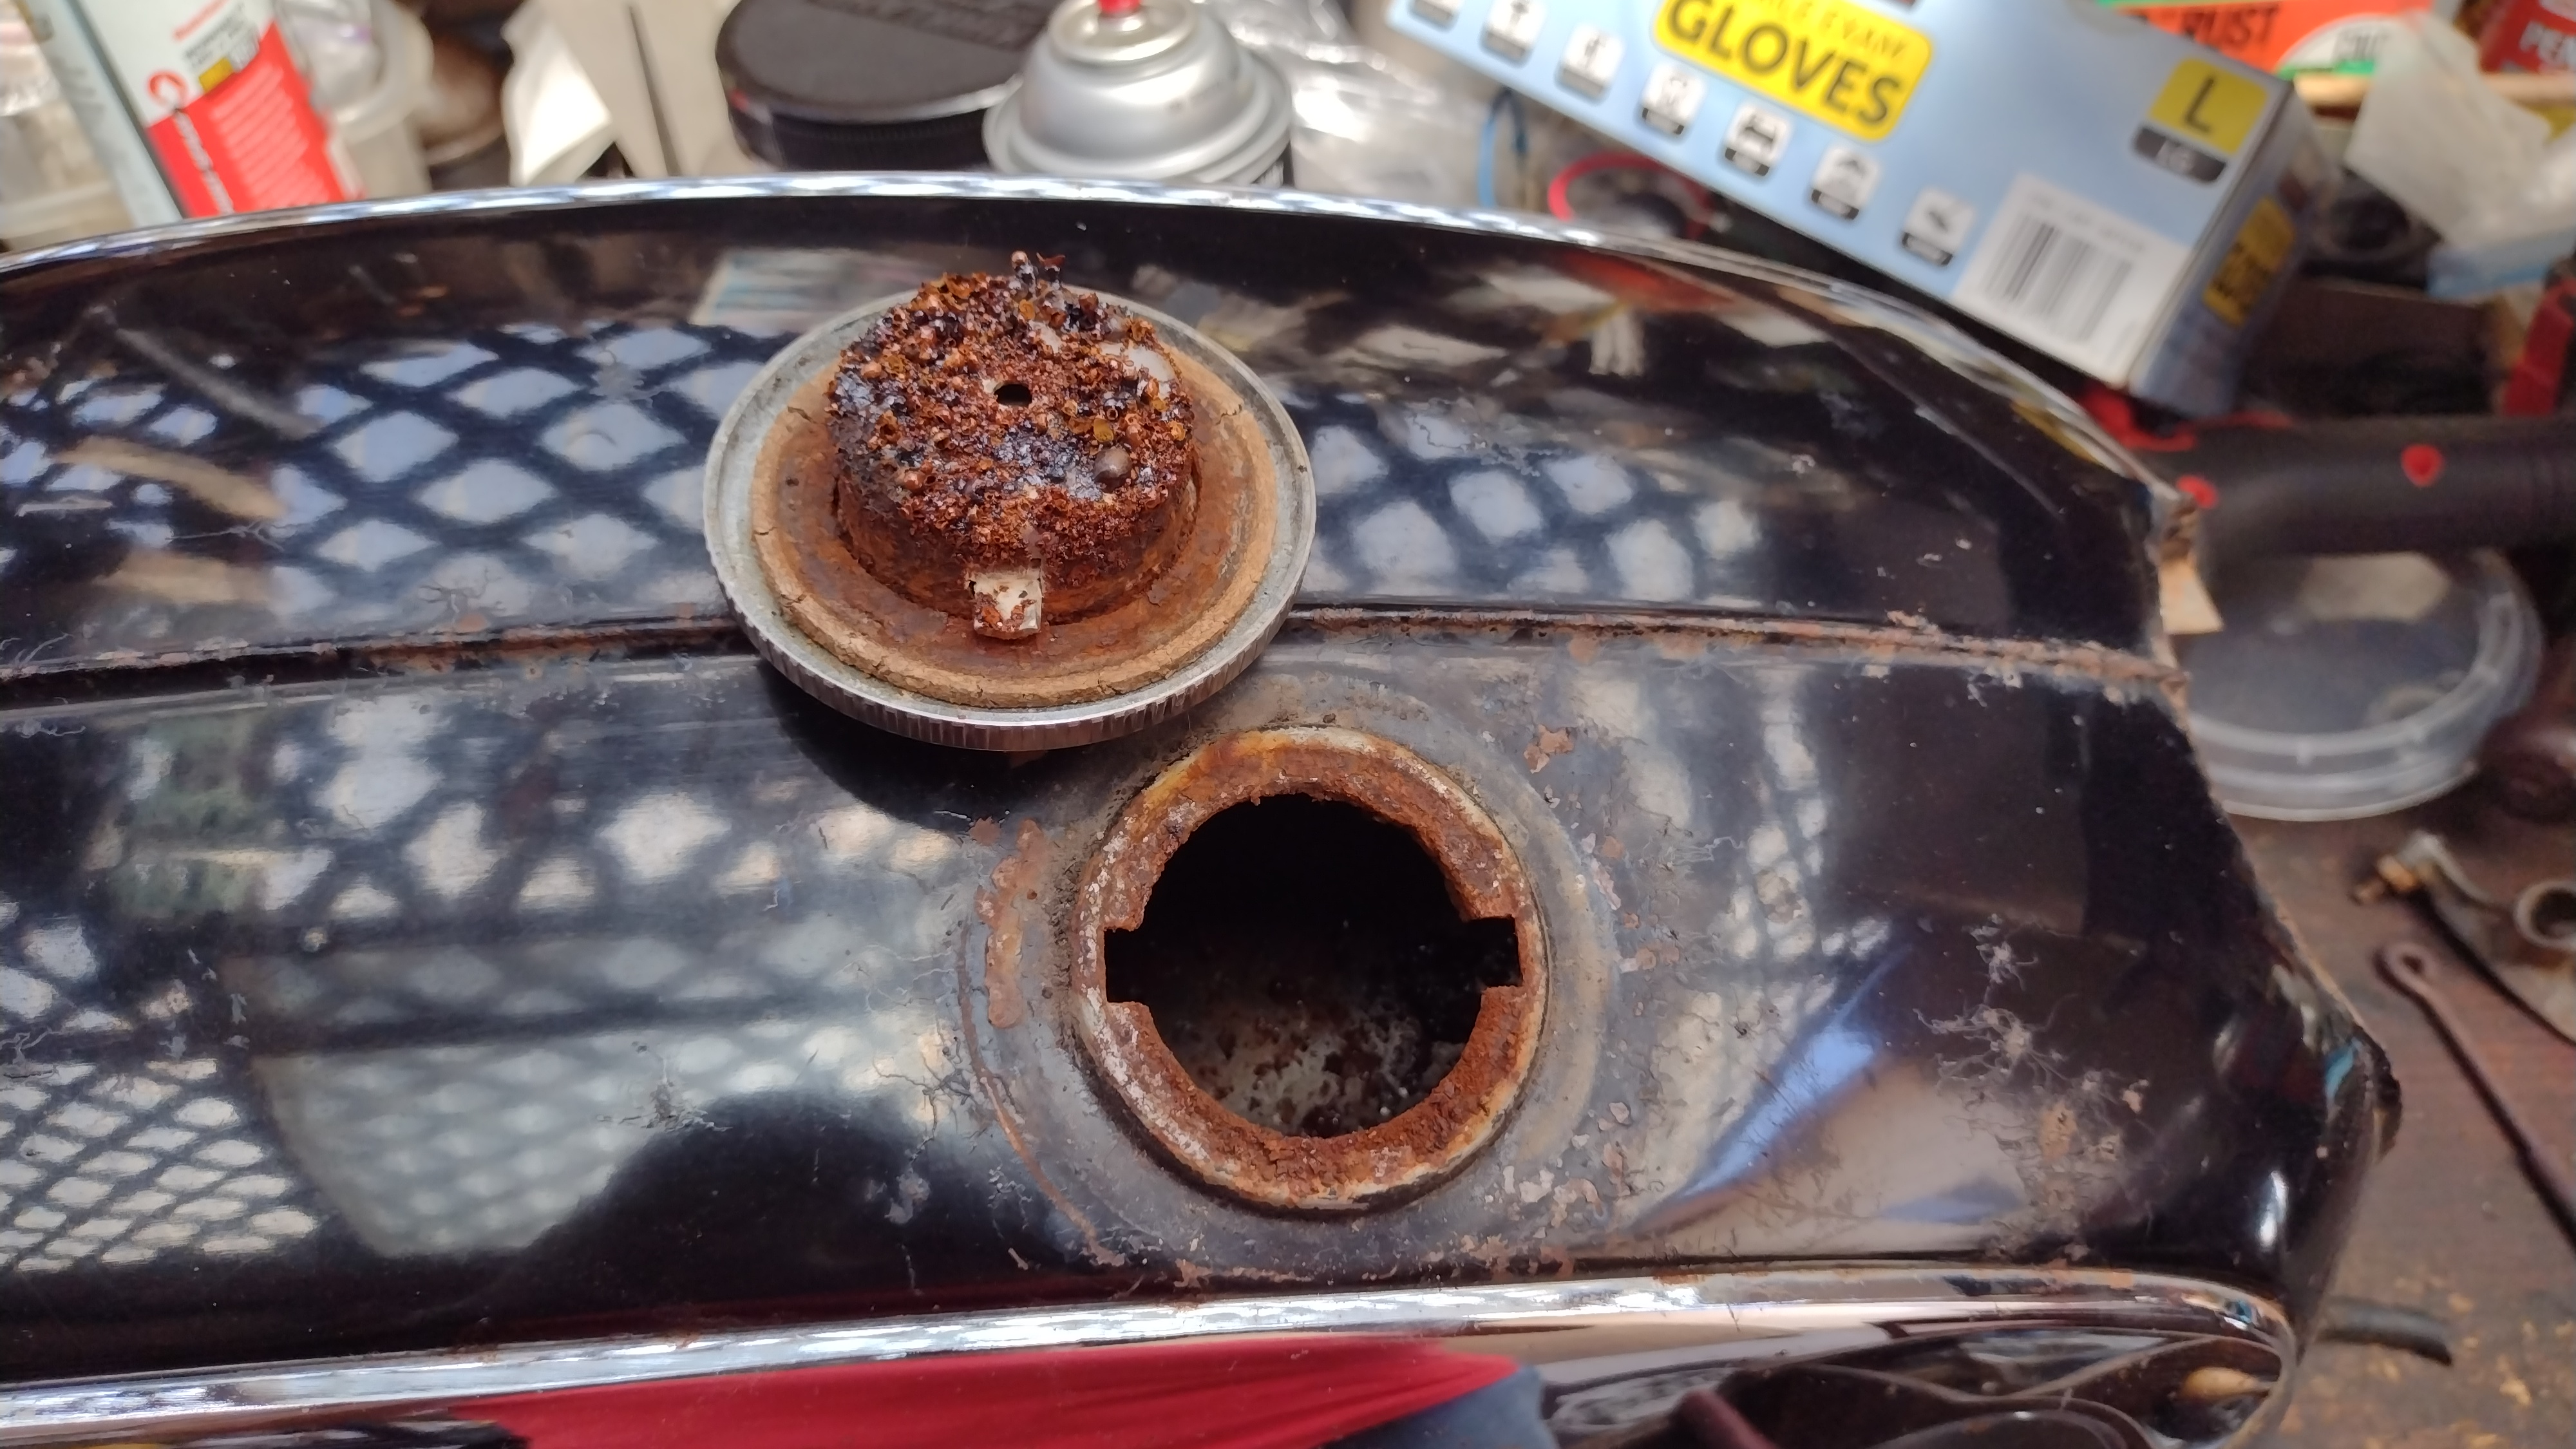
Starting
with the fuel tank, a big set of Channel-Lock pliers were needed to
remove the gas cap, which was coated with rust on the inner face,
plus the petcock came out coated with rust, as well. I am not even
going to mess with this one, so it goes to the local radiator shop
for cleaning and a Red-Cote coating. They charge $180 for the service
and it is worth it to me to just get it done rather than sit with it
for a few days while it gets de-rusted and then coated with Caswell,
which is my preferred product for sealing fuel tanks. There is so
much going on in the way of needed repairs that I’ll gladly farm
out the gas tank cleaning.
It
took about 2 hours to get the engine extracted from the chassis.
Someone had bodged up installing some small coils that had attached
condensers to the brackets. I didn’t recognize the coil sets, so
they must be from some other brand of a Japanese bike. The coils each
had individual condensers attached.
The
air filter tubes just broke into pieces when removed and the air
filters were all originals with 60 years of aging. All of those will
be replaced from Tim McDowell’s ClassicHondaRestoration.com site.
I
wrestled the 115 lb lump onto the workbench and carefully used my
impact driver to loosen and extract all of the cylinder head screws
for the tach drive and point side cover. Removing the top cylinder
head cover, I was relieved to see that the camshaft and rockers and
even the valve springs were still quite clean and shiny, owing to the
low miles of use on the engine. The cam chain link was just a few
inches down inside the head and I was able to knock the side plate
clip loose and detach the camchain from the sprocket without having
to cut it.
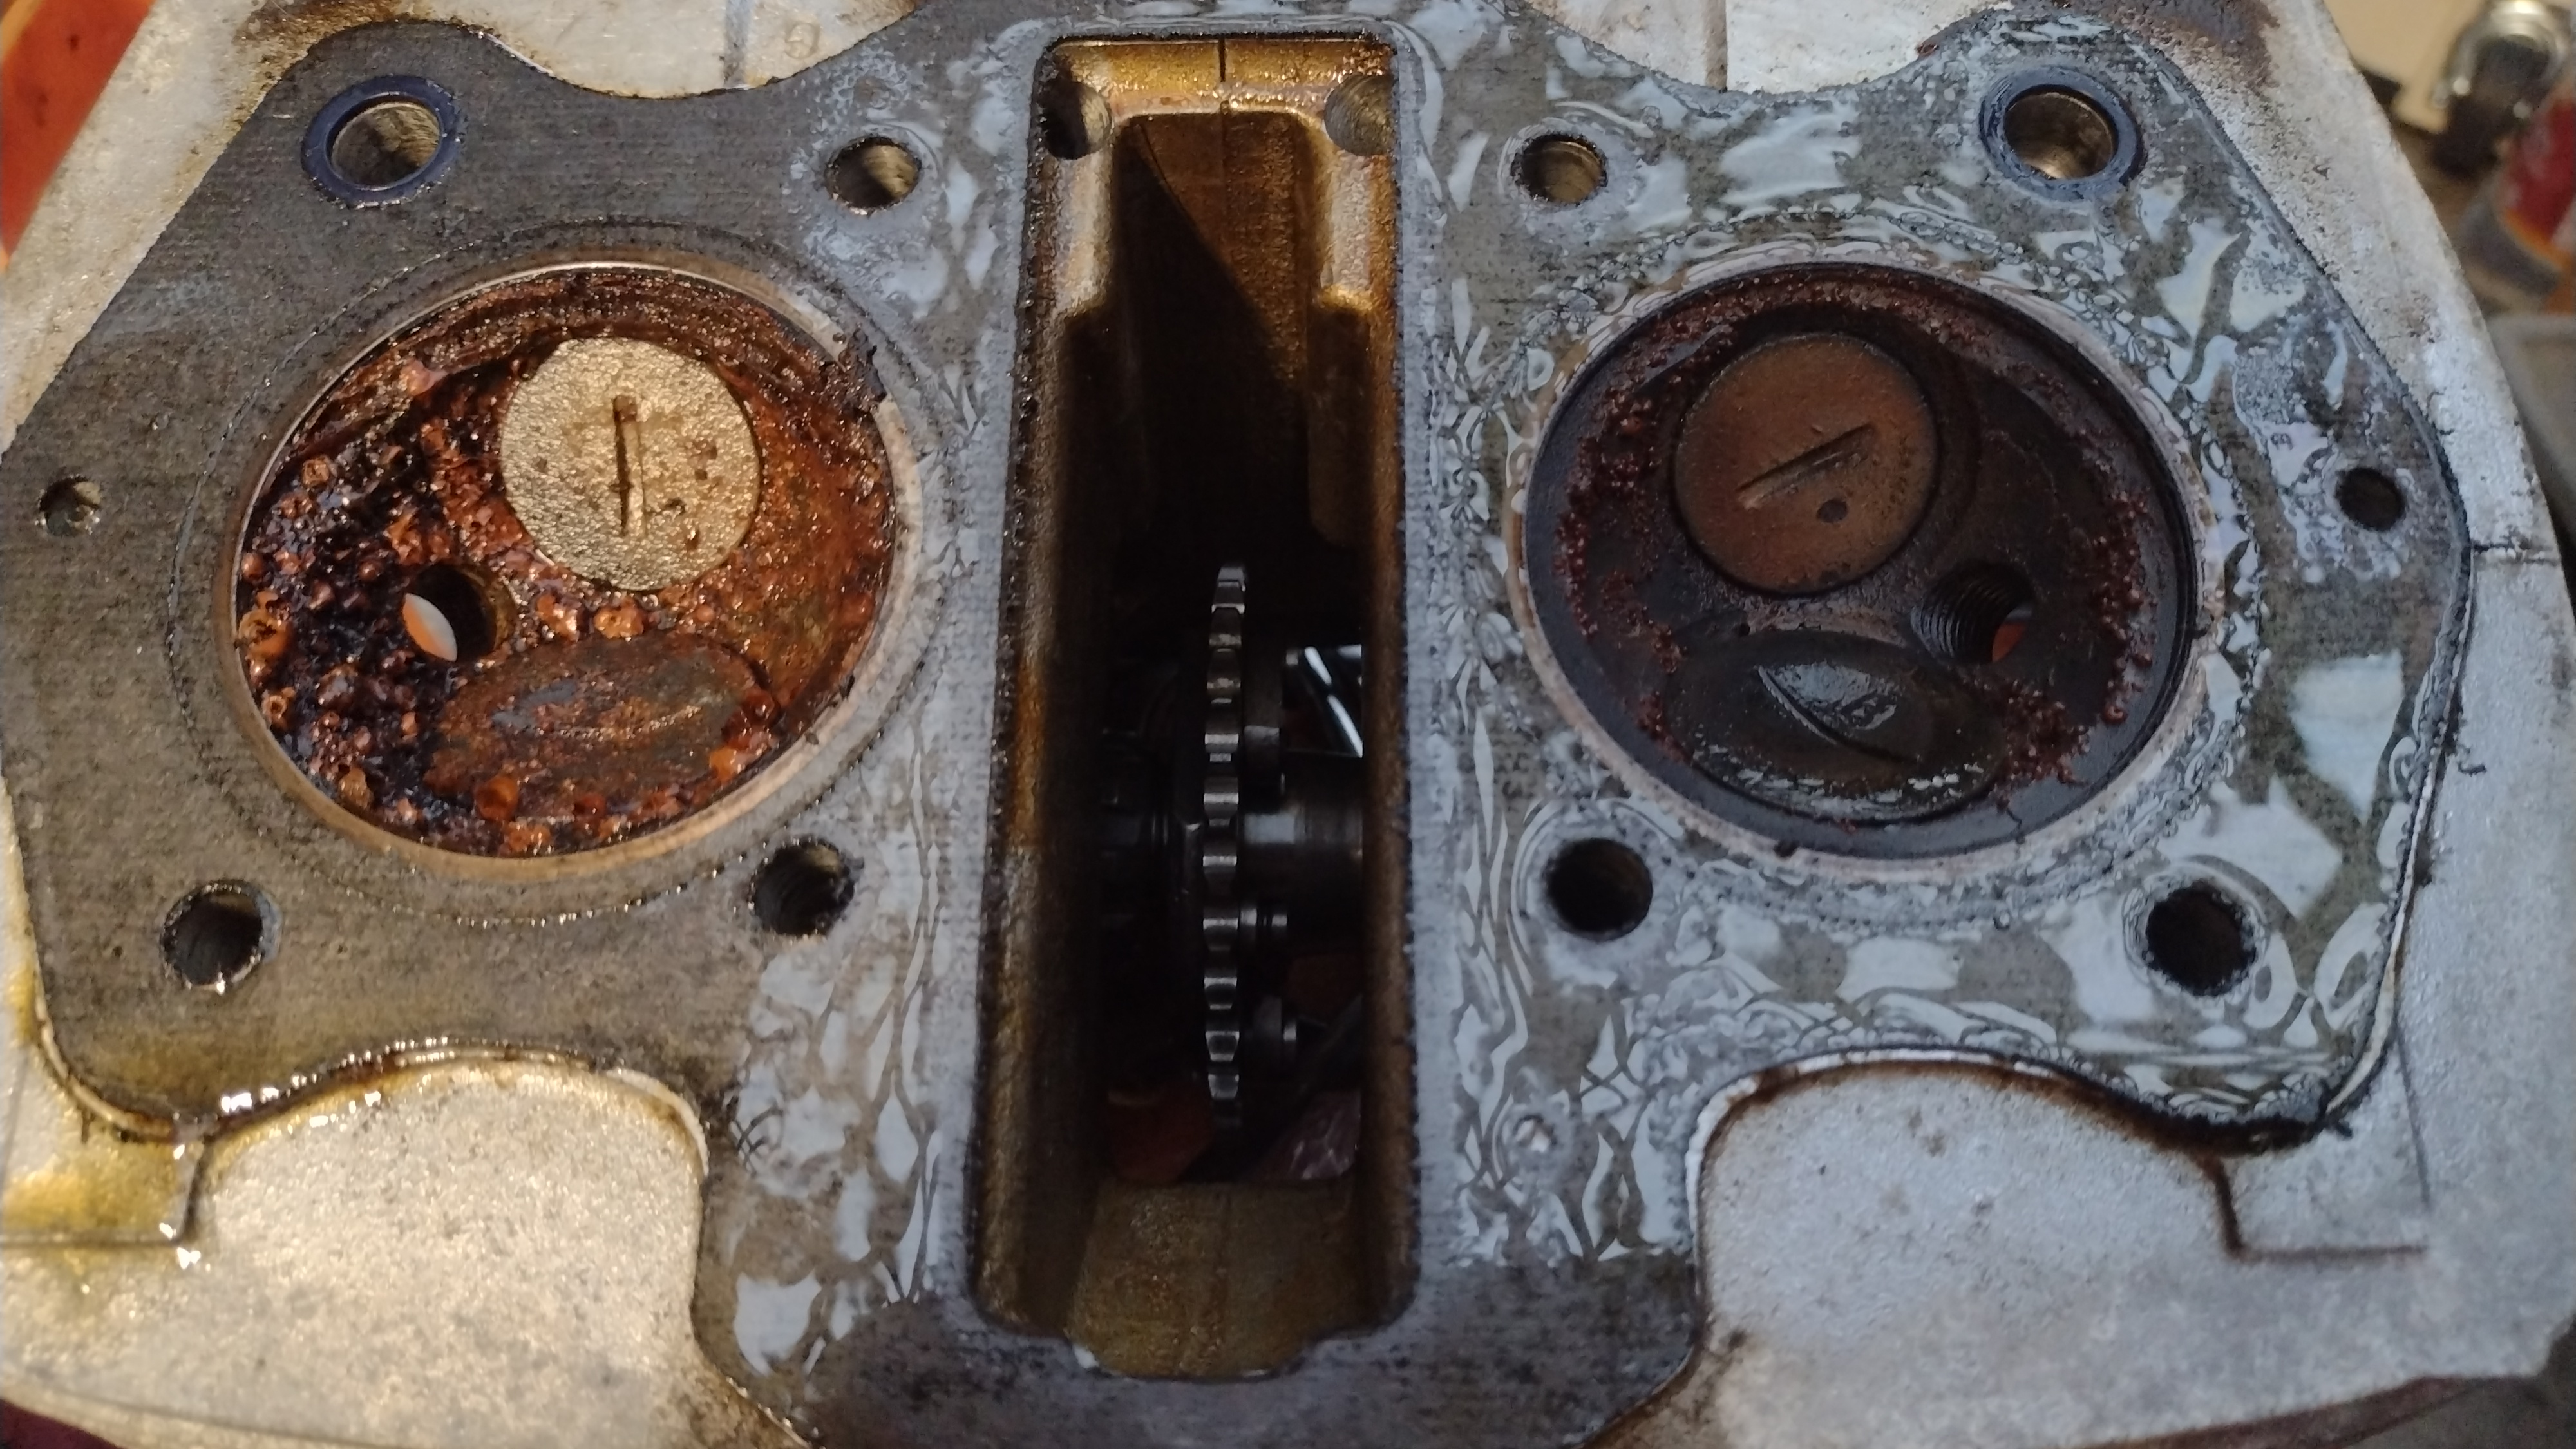
Once
the head was off, it was evident that water had worked its way into
the right side intake port and rusted the piston into the cylinder
liner. The left side showed water damage but looked better than the
right side.

Tearing
down stuck 250-305 engines is always a challenge, but usually
successful. The usual water in one cylinder causes the rings to get
glued into the ring lands and then rusted into the cylinder walls.
After overnight soaking in penetrating oil, I washed it all off and
layered on some metal prep, let it sit awhile, and then used my
steering wheel puller as a pusher and was able to very slowly drive
the right side piston down from near TDC to almost the bottom of the
cylinder. Fortunately, the left side wasn't really stuck, so it moved
up as the right went down. I took the wrist pin out of the left side
to free up the cylinders and then pulled the cylinder block up and
away from the cases. The piston was STILL dragging in the bore, so I
used an air hammer to push it out while pulling up on the block. So,
I thought that was the end of the hard work...... As I removed the
clutch and primary nut, the clutch basket wouldn't budge! I have
never seen a problem like this but the basket was seized on the main
shaft! After a lot of prying unsuccessfully, I discovered a giant
3-jaw puller in my toolbox and was able to wrap it around the clutch
basket and primary chain and slowly pull the basket off the end of
the main shaft. Has anyone else ever seen this kind of problem
before? It's a new one for me.
Once the engine was completely torn
down, the time-consuming task is to get the dirt, grease, gasket
material, case sealant, and corrosion out of the nooks and crannies of
the intricately designed die-cast cases. I started with paint thinner
to get through the worst of the greasy parts, then poured straight
metal prep (phosphoric acid) all over the outside, and then scrubbed
with brushes and small tools to get into places that had collected
impacted dirt and leftover grease. A rinse with water to neutralize
the acid, left the remaining scale in many spots so a round of
drill-motor powered brass brushes and scrapers removed more of the
remaining scale and grit, then the second round of acid bath foamed up
where the remaining scale was, then given a final bath and then
blow-dry with compressed air. At that point the cases got a coat of
Duplicolor Cast Coat Aluminum paint to give the surfaces a little bit
of shine. The engine case cleaning and painting process took well over
two hours alone.
Beginning the engine assembly
requires a close look at all of the parts to ensure full function at
start-up time. The crankshaft was dropped back in and the bearings
aligned on the knock pins. I had checked the gear dog engagement when
the cases were first split and I could see that the transmission
would need some offset gear cotters to remedy the lack of engagement
on both shafts. Again, the engine only had 1600 miles on it from new,
so remarkably the engine internals were still bright and shiny.
I dug through a pile of old
transmission parts to find the correct main shaft to replace the one
which had the clutch basket seized up on it. The first one I grabbed
and cleaned up turned out to be from a Dream, so the teeth count was
incorrect. A second one had worn teeth and a third one turned out to
be correct for the CB engine. The shift drum and forks were
reinstalled and the gear dog engagement was checked and found to be
correct once the offset cotters were installed.
The bottom engine case had very
little in the way of debris and the usual goo that is always present
at the bottom of the engine from oil additives that fall out of
suspension and sink to the bottom, so cleaning up there took no time at
all. Even the oil pump screen was bright and shiny. In the end, the
bike was no doubt put aside when the clutch basket seized on the main
shaft, causing major operational problems. The black CA license plate
carried 1977 tags, denoting its last year of use.
The nice-looking, but damaged clutch
basket could not be saved. Running a hone on the inside of the
mounting sleeve only revealed further damage to the machined hole.
Not only were there circular rings of damage out at the edges, but
two deep scrapes were noted that must have come from the factory
assembly process. My choice of clutch baskets were clean, but
non-cushioned types from the earlier models. The clutch plate set,
expected to be stuck together after forty five years, slipped out
looking new! It was one of the last 6 plate clutch packs used, before
Honda upgraded to the 5 plate type.
All of the fasteners needed a bath
in Metal Rescue and a turn at the wire wheel for final cleaning. I
purchased an engine screw kit from Tim McDowell, in addition to all
the air filter parts, gaskets, and other misc items that totaled
about $500. New carb kits and a petcock repair kit were part of the
package and fortunately, the carburetor slides came out without too
much pulling. The petcock tube was covered in rust and the body will
need a full cleaning and perhaps replacement of the brass tube.
I love the new MotoBatt batteries
which are sealed AGM types, so no more acid stains in the future. The
whole ignition switch had been punched out, leaving the back side of
the switch with the wiring connectors. Like so many other components
now, a NOS ignition switch is a rare find and the prices are in the
$200-250 range now for those which are still on the market.
Even finding tires of the right size
is becoming difficult. Lately, I have been using 3.00x18 tires on both
ends, versus a 2.75 front. The original ribbed front designs are
pretty much extinct now. With the wheels off for new tires, the
related task is to disassemble the brake plates and clean/lubricate
the brake cams which the brake shoes are operated from. Honda staked
the outer nuts that hold the brake anchor pins, so they need to be
ground down a bit to allow the nuts to be removed. I ran a tap down
the brake plate holes and a die on the pivot bolts to clean up the
threads for reassembly. It was time-consuming to have to clean each
and every part, usually throwing them into a pan of phosphoric acid
to neutralize the old rust and aluminum oxide corrosion that had
built up on the alloy parts over the last 50+ years.
I had a spare set of cylinders that
were already bored to new .75 over pistons, so those were going in to
shorten up the assembly time. The cylinder head came apart easily and
the valve seats were just lightly touched up. I was able to reuse the
valves once the rust and corrosion were removed. The engine was
reassembled using a new screw kit for outside fasteners. I had to
drill the heads off of a few of them during disassembly. Once all the
parts are cleaned up, reassembly can begin which is fairly
straightforward if you have done a few of them in the past.
With the engine work done, the task
of wedging it back into the chassis is always a chore, due to the
weight and finding the right point underneath to get a little floor
jack beneath the cases. Hauling the engine on and off the workbench
is getting to be a trying experience for my old bones these days.
Fortunately, I didn’t do any serious damage to my body in the
installation and the motor bolted up normally.
The rims were really badly rusted,
so I put out a call to my friend Rick Bowers in LA and he had a set
of OEM DID rims available These were the real deal without the DOT
stampings on the side that are the replacements for the original
rims. They are probably way too good to put on the bike considering
the rust and corrosion beneath all of the paint and in all the little
corners of the chassis, but they were available and perhaps the rest
of the bike will catch up to the wheel sets sometime in the future.
I spent about 3 hours on each wheel
from start to finish. The rear brake cable was rusted to the brake
plate which took about 15 minutes to extract without damaging the
plate. There was so much corrosion damage from the steel-aluminum
interactions on the bike that every fastener needed to be carefully
removed and then cleaned to allow easy assembly again. All the alloy
parts got the acid bath, then rinse and a coat of paint to help cover
up the corrosion damage. The brake plates still had some of the
clearcoat paint on them, but it slumped right off when I sprayed them
with brake cleaner. The decision at that point is whether to send all
the brake parts out for polishing or just scrubbing them up and
laying down a coat of cover-up paint, which is what happened in the
end.
Once the engine was secured, all the
added-on parts followed, including new air filters and tubes. I wound
up having to remove the left carburetor again when I went to start it
up. The little passage that vents the float bowl was still blocked
with leftover varnish and it caused the float bowl to overflow into
the air filter tube and filter paper. Once that passage was cleared
the bike fired up easily and sounded pretty good after its 45-year-old slumber.

The ignition points were seized on
the pivot pins and rusted shut at the contacts. I had 5 sets of left
points and no right side ones in stock. I figured out that you can
take a left set of points apart, flip the pivoting contact arm over
and it fits the opposite side! I was able to dial in the ignition
timing, but the results were not totally acceptable. Setting the
right side timing wound up with the point backing plate turned all
the way retarded and the point gap was probably down towards .012”
whereas the left side point gap wound up in the .018” range in
order to get both sides to fire at the F/LF marks at idle. Still, it
starts quickly and idles down nicely even when cold.
Test ride results: No good deed
goes unpunished….
Riding the bike with cutoff shorts
and Crocs, I felt something wet hitting my legs on both sides going
out on my test run. Returned to find a drip from the clutch cover
and the drain bolt. Also, the tach drive housing had a gasket leak. I
added a second gasket to the
clutch cover, installed a new drain plug gasket and then pulled the
bike on the rack for fork seal leaks. It took three hours to get the
front end off, the forks removed and apart. I replaced one seal that
I had in stock but wound up using a re-chromed fork seal holder that
already had a new seal installed. I loosened up the fork bridge
enough to remove the left fork ear which had a shipping dent in the
side. Using a muffler pipe expander tool, I was able to remove most
of the dent. Thankfully, the forks basically slid out of the triple
clamps when I loosened the stem pinch bolt. There was a little pool
of fork oil above each seal, so they definitely were leaking and the
original 57-year-old parts.
It wasn’t really unexpected, considering the condition of the bike
and the age and storage history, but it added some extra time and
parts to get it dialed in correctly.
The transmission shifts wonderfully
and the clutch is fairly easy to manage at the lever. I suspect that
the speedo-tach will have to go to Foreign Speedo in San Diego for an
inspection and lubrication although the needles were pretty steady
for the short test runs. The meter bushings lose their lubrication
and then they start screaming noisily and the needles start flicking
back and forth uncontrolled. Riding with the meters in this condition
will cause permanent damage to the meter movements.
More test rides revealed continuing
oil leaks on the left side of the engine. I removed the clutch cover
again, scraped off the sealant that I used last time, and planed off
the cover where a high spot showed up when checked with a
straightedge. Again, 2 gaskets were used and this time the clutch
cover stayed dry, but then the two adjacent studs with the plain
washers and nuts were dripping down the sides. I rounded up two
sealing washers and cap nuts and that finally stopped the oil
weeping.
The bike fires up with no choke and idles down pretty quickly. These
old bikes still ride like ancient pickup trucks when the original
suspension parts are kept in place. A good set of rear shocks would
help the back end. Just getting the engine installed and running is
only the first step to getting a bike fully operational and safe. The
parts bill on the bike was close to $2k alone, plus way too many
hours for me cleaning and dealing with rust and corrosion on every
piece of the bike. I installed a NOS CL72 ignition switch and lock
set that came from Holland at a hefty cost. The CL switches have a
longer lock cylinder barrel than the CB models, so I rounded up an
early CL72 cover latch to help cover up the extended threads on the
switch extension. I had to buy a matching OEM key for the steering
lock that was still in the bike, then float a lot of penetrating oil
into the lock to get it to move. I probably spent twenty minutes just
getting the old lock out, finally using a small slide hammer to ease
the lock out of the steering stem. There are dozens of little
time-consuming tasks like this as you go through the whole bike and
test/check all the systems and fasteners that hold it all together.
Rebuilding these old bikes requires a LOT of patience and time, in
order to have an eventual good outcome.
In the end, the bike was safe and reliable to ride after 45 years of
deep sleep. It isn’t much prettier than when it came to me, apart
from the shiny engine and rims/spokes. There is still a lot of rust
and corrosion in the nooks and crannies of the chassis and on all of
the chromed and polished parts, but it isn’t critical to the
“safety of flight” for this vintage Honda. The CP77 is a rare
find in the US, so perhaps it will get continuing cleaning and
perhaps a new paint job someday to make it look as good as it runs
now.
Bill aka "MrHonda" Silver
08/2022
PS... the bike turned out to have been owned by Steve McQueen and was sold on a BAT auction for $31K! https://bringatrailer.com/listing/1965-honda-cb77-superhawk-7/